The Ultimate Guide to Creating Your Own Interactive Travel Map with Map My Travels
Tice
January 26, 2024
Traveling is one of the most exciting things you can do in life. It’s a great way to explore new places, meet new people, and learn about different cultures. And creating interactive travel maps is one of the most unique and interesting ways to share your travels and tours with the world. That’s why I created Map My Travels! Map My Travels is an web app that lets you create your own travel map with pins for each place you’ve visited. You can also add photos and notes to each pin so you never forget where you went or what happened there. Show the exact path you traveled by uploading a GPS file or directly importing it from your Strava account. Whether you’re a seasoned traveler or just planning your first trip, this guide will show you how to craft a beautiful, detailed travel map and how to share it with the world.
From sign up to creating your first travel map
Signing up with Map My Travels is easy. Just click the button below and you’ll be taken to the sign up page. You can sign up with your email address or with your Google account. After signing up, you’ll be taken to the dashboard where you can create your first travel map.
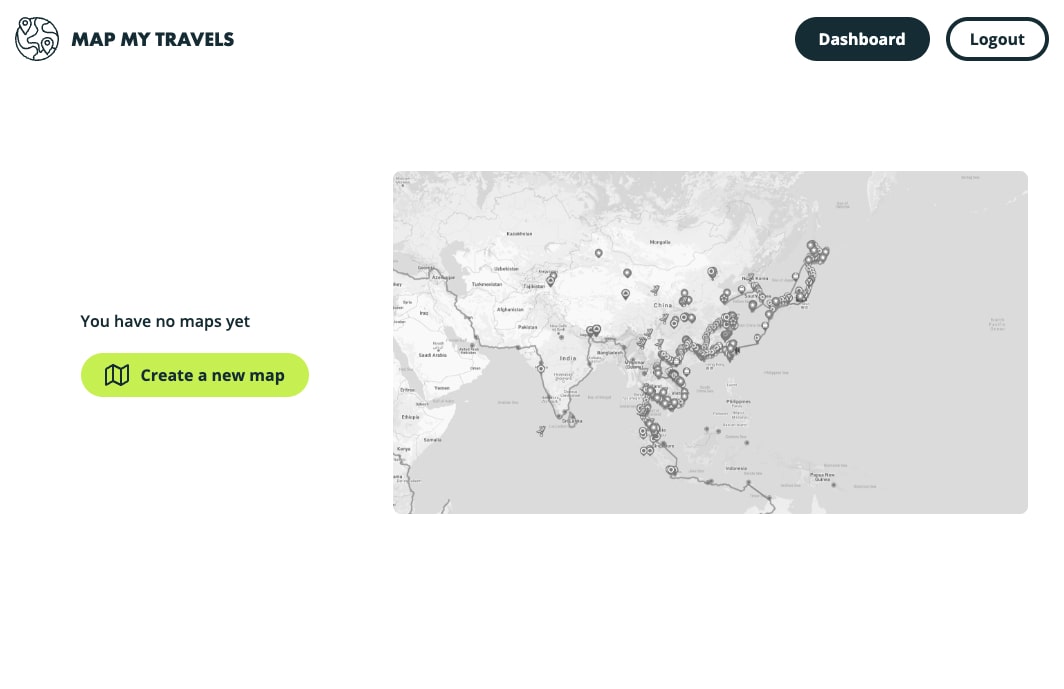
From here, click "Create a new map" to create your first travel map and open it in the map editor!
Change the travel map name and look of the map
In the top-left corner you see the map's name. By default this will be something like "Map 1" if it's your first map, counting up. Change the name by simply clicking on it and start typing. It will save automatically.
You can also change the look of your map in the map settings. Navigate to the bottom left corner and locate the "cog" icon. When clicking on this button, you see a few options. The first one is to change the "type" of the map. Google Maps provides with 4 different map types. If you've ever used Google Maps you've probably already switched the map type from road to satellite or terrain before, so these are the options you can change your travel map's appearance to:
- Roadmap
- Satellite (with text)
- Satellite (no text)
- Terrain
Play around with the different options and see which one fits best for your map!

Setting a default center for your travel map
There is one last thing you can change here, which is setting the default center of your travel map. This means that when people see your map for the first time, like on your website or in a link you share, this is the view they will see first. If you don't set this, then the default view will be calculated by the items that are on the map, and will try to display all of them by default. But this can be unwanted, especially if you have points all over the world! You'd like to zoom in on the most important part, or maybe the area that you are currently traveling in. You can set this by clicking "Set default center".
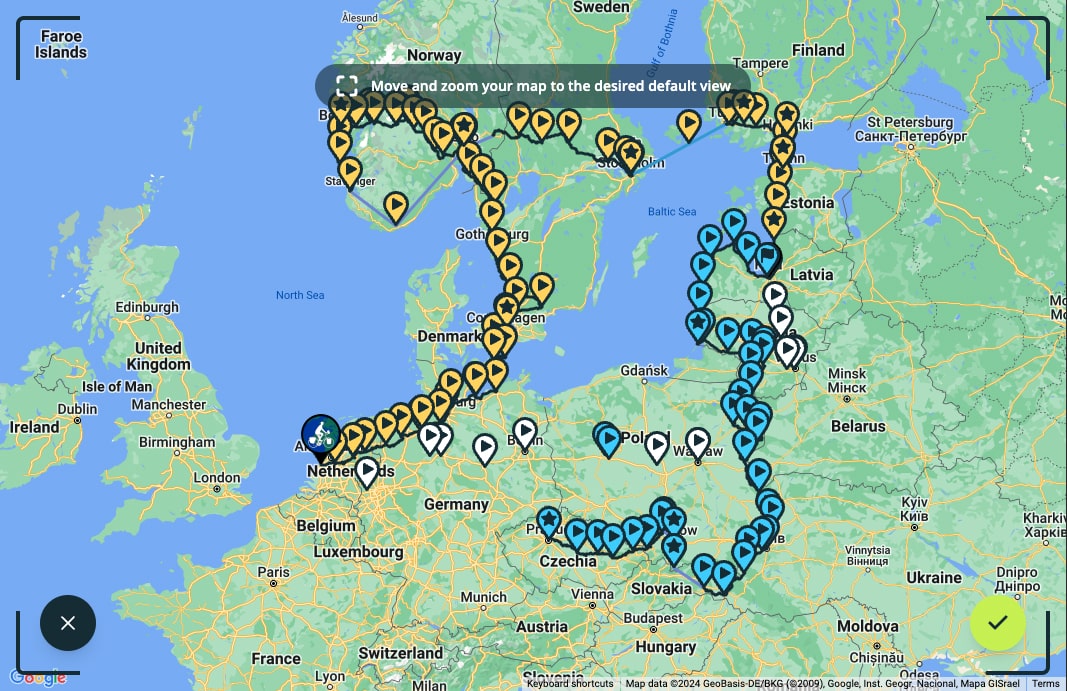
Simply pan and zoom your map to the default center you think looks good. After you're done click the "check" icon in the bottom right. After this the default center is saved and will be used. Try refreshing the page to see the effect!
Tip: the map will look different on different devices and might appear a bit too "zoomed in" on a phone. When setting a default center, make sure it's a bit more zoomed out to account for this.
Adding markers to your travel map
You can add 2 types of markers to your travel map:
- Markers created through a marker creator where you construct a marker by picking an icon and the marker colors
- Custom uploaded images you use as a marker, this can literally be anything!
Below I will explain how you add each type of marker
Adding a marker through the marker creator
When you don't have any markers on your map, you will already see the marker creator when you click on "Add a marker" in the bottom (marker icon on mobile in the right side menu).
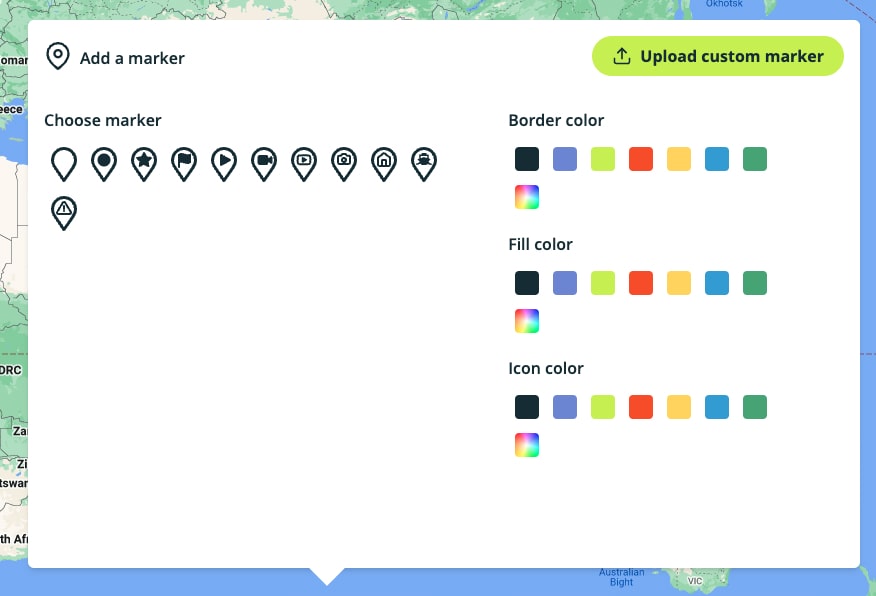
Here you pick the icon you want to display on your marker. For example when you created a YouTube video at a specific location, you can use the "YouTube" icon. Or you want to mark where you were staying during a specific trip, then the "house" icon would be most fitting. I tried to add the most relevant type of markers here, but as you can see, there is plenty of room for more! So I might add more in the future.
After this you can pick colors for the border, fill and icon. If the preset colors do not fit your style, then use the color picker to choose any color you want.
After you've chosen your marker's icon, then at the bottom the "Next" button appears, after which you can place your marker on your travel map! I'll cover how to do that below, but first I want to talk about when the pre-selected marker icons do not suit your fancy, then you can upload your own marker icon!
Uploading your own marker icon
To do this, you can click the "Upload custom marker" button in the top right of this marker editor screen. From here simply select the icon you want to use. You can upload any image format like jpg, png, svg etc.
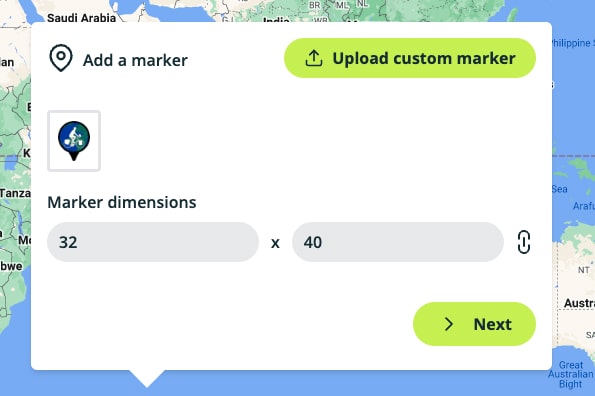
After you've uploaded your marker icon, it will be given a standard dimension based on the icon, but maybe you want it to be way bigger or way smaller than those dimensions. You can change the dimensions here! Click the "link" icon to snap the aspect ratio so that the image doesn't look stretched either horizontally or vertically.
Now it's time to put it on the map! Click "next" to start dropping your new marker on your travel map!
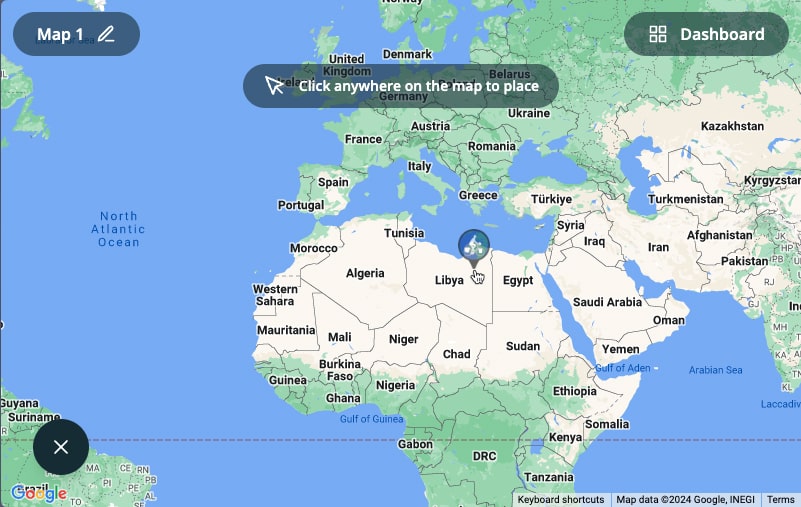
Dropping the marker on your travel map
Dropping the marker on your travel map is as easy as it looks. When you move your mouse around on a laptop or desktop computer, you see the marker "hovering" over your mouse, simply click on the map to drop it right there! On a phone you won't see the preview, but it works the same: just tap on the map to drop it!
When the marker is dropped you will see 4 buttons appearing around it:
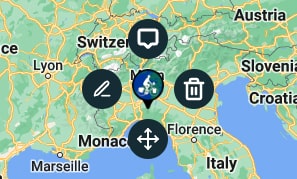
These are actions you can take now that your marker is on the map. Let's go over them quickly:
 With this button you can add a popup and fill it with content about your marker. More on
this in the next section!
With this button you can add a popup and fill it with content about your marker. More on
this in the next section! When clicking this button you delete the marker from your map. If you've uploaded an icon,
this one is still available to add to your map later!
When clicking this button you delete the marker from your map. If you've uploaded an icon,
this one is still available to add to your map later! When clicking this button, it allows you to move your marker again to a different position!
 With this button you can change your marker icon to a different one!
Now, when you want to add another marker, you can see that the popup has slightly changed:
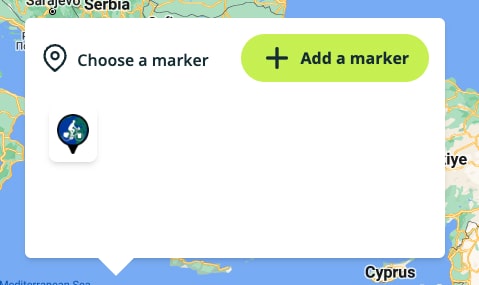
Any marker you've added to your travel map are saved here. And if you uploaded a marker but then deleted it from the map, the icon will still be available here to add quickly. Just select the marker you want to add and click next to drop it on the map again!
Adding content to your travel map: adding popups to the markers
What is a marker without any context? Like it's just sitting there doing nothing. We have to add some content to it! And the best way to do that is by giving it a popup so that when people click on it, a popup appears with information about that marker. And with Map My Travels you can add a variety of content to your travel map, namely:
- Title, description and a date
- An image
- A YouTube video
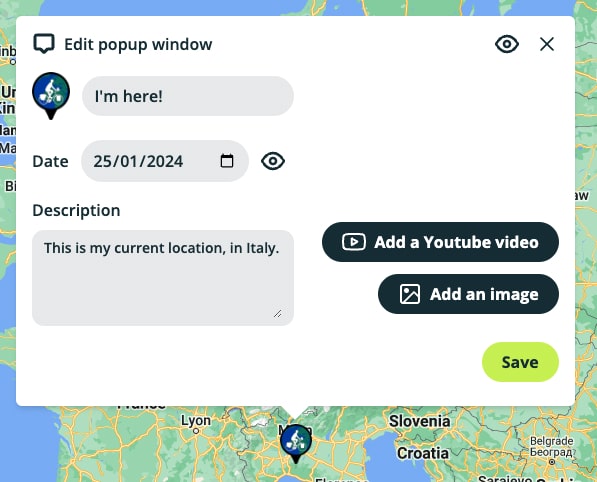
To activate the popup on your marker, just make sure it has at least some content. This can be only a title or description filled out. When clicking on your marker, you see the "4 actions" again like described in the previous chapter on adding markers to your travel map. Now click the top "popup" icon and a popup should appear with various fields you can fill in.
You can optionally hide the date if you don't want this to show. Also you can either upload a picture or add a YouTube video, but not both. When adding a YouTube video, just paste in the YouTube video link, you should see it appear in here when you added the correct link.
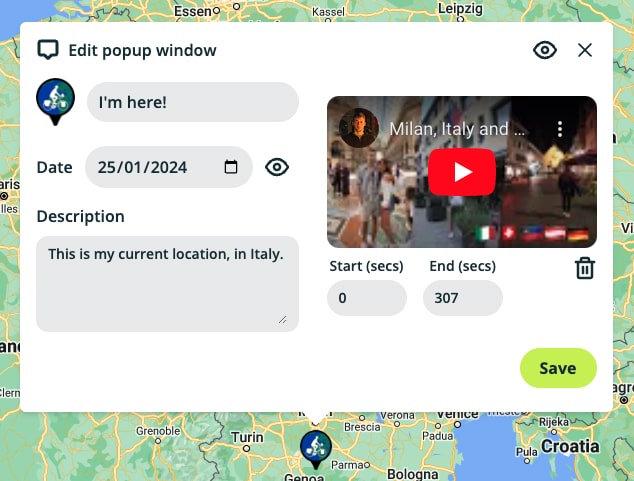
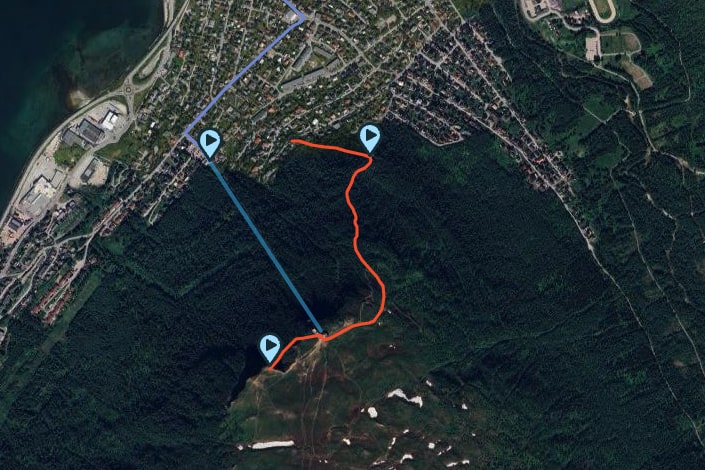
For YouTube videos you can optionally designate a start and end time. This can be handy when you have 1 video on YouTube in which you go to a few different places, but you only want to show the part of the video taken at that specific location in the marker. I used this in my Tromsø map section. I only had 1 video of my time in Tromsø, but wanted the map to be populated with all the places I visited when I was there!
Lastly, if you have provided your popup with content, but you're not yet ready to show the popup, then you can simply hide the popup for now by clicking on the little "eye" icon all the way in the top right.
Show your travel routes: Upload GPS files to your travel map
Having a bunch of markers on your travel map is already pretty cool and interactive. But we're still missing 1 key element: the route you took to go from marker to marker. Within Map My Travels there are various ways you can add these traveled routes to your travel map. One of the easiest ways is to upload a GPS file.
Now if you're not familiar with GPS files, they are basically files that contain special geolocation data that map applications like Google Maps can read and display. They are also often used by applications like Strava or Garmin and if you use these tools, then you can probably download GPS files from them. You can upload 2 types of GPS files to your travel map in Map My Travels:
- GPX (GPS Exchange Format): A widely accepted format for geographic information. Mostly used by outdoor enthusiasts, like runners, cyclists etc.
- KML (Keyhole Markup Language): Similar to GPX but used more in applications like Google Earth and Google Maps for displaying geographic data.
Uploading a GPS file to your map
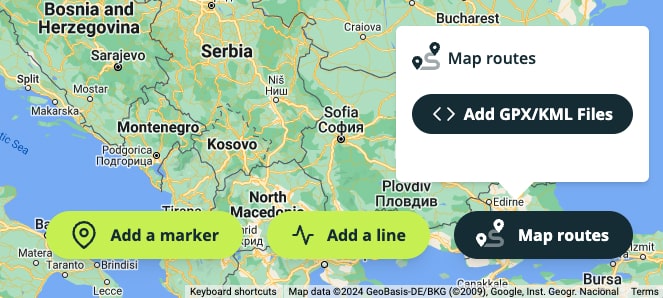
Uploading a GPS file is really simple. You click on the 3rd button in the bottom right of the map creator, it's called "Map Routes" as this is where all your map routes will be stored for easy access.
Click on the upload button in this window and upload your GPX or KML file. After uploading it, it should appear on the map as a black line, like this:
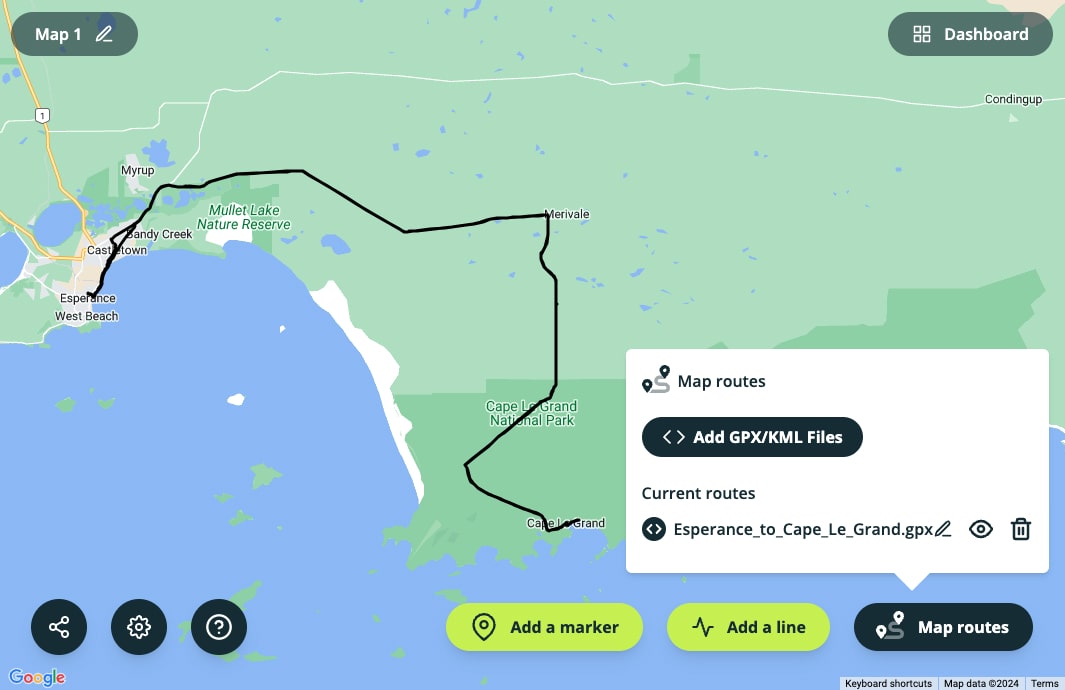
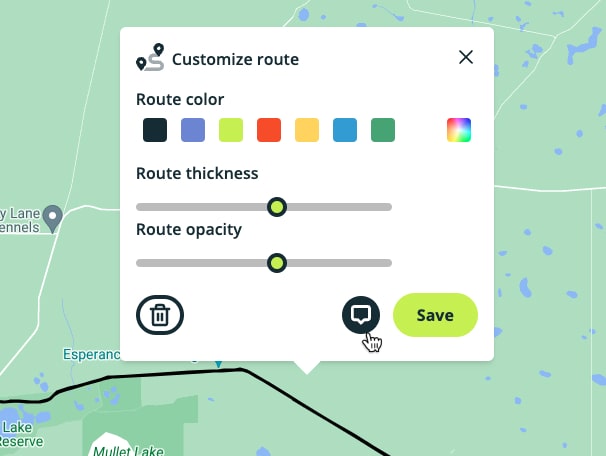
It's easy to manage your routes from this section, you can click the pencil icon to change the appearance of the line. You can change its thickness, opacity and color. You can also hide the route if you don't want it displayed, but not deleted. And of course you can delete your route here as well.
Lastly, you can also add a popup window to your route line! This can be handy if you want to add some context to a specific route you added to the map. To do this, in the popup window that comes up when you want to edit the line's appearance, locate the "popup" button in the bottom next to the "Save" button:
From here it's the same like editing a popup window for markers. You can hide it as well if you don't want it to come up when people click on the route line.
Import strava activities
This feature is currently only available on a paid plan. Please check out the pricing page for more information on this.
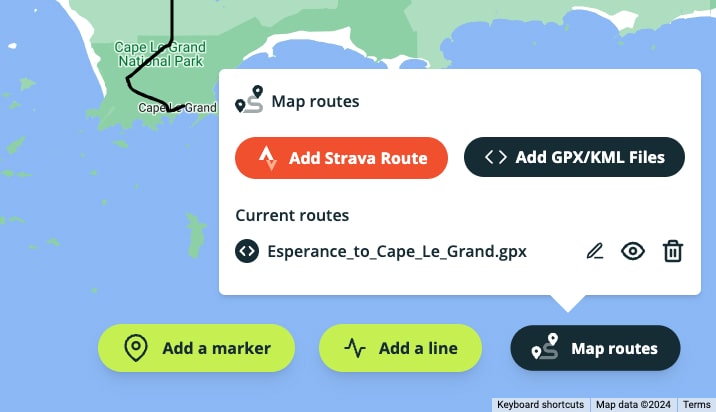
You can also connect your Strava account to Map My Travels to import routes directly from Strava! Doing this is super easy. First make sure you are on a paid plan. Then you should see another button in the window of the map routes:
When you click this button, it will open the login page of Strava if you aren't logged in on there. Log in to Strava and then you will see the following screen:
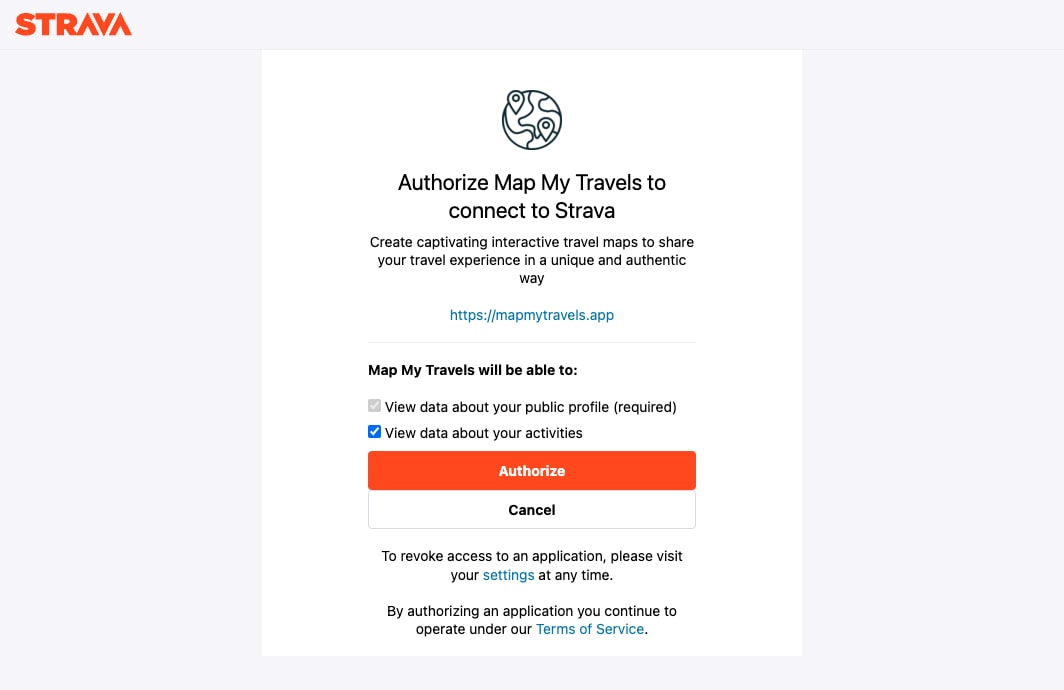
Make sure that "View data about your activities" is checked! Otherwise it will not work. Then click "Authorize".
After this you should go back to the map creator, and see a list of your most recent Strava activities:
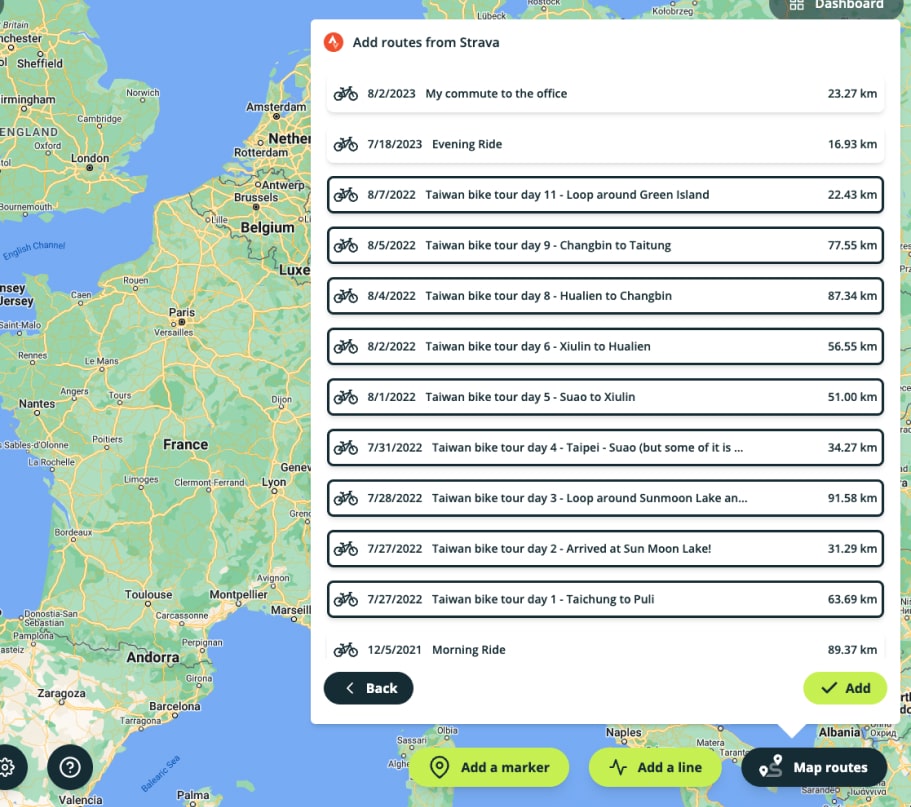
Select as many routes as you want to add, then simply click "Add" and they will appear on your map as individual routes! From here you can update their appearance as well. Change their color etc.
Draw lines on your travel map
If you don't have any recorded data of your routes, don't fret! There is another option you can use to really simply add lines or routes to your map, and that is to just draw them! For this, click the second button in the bottom right corner of the map creator, called "Add a line".
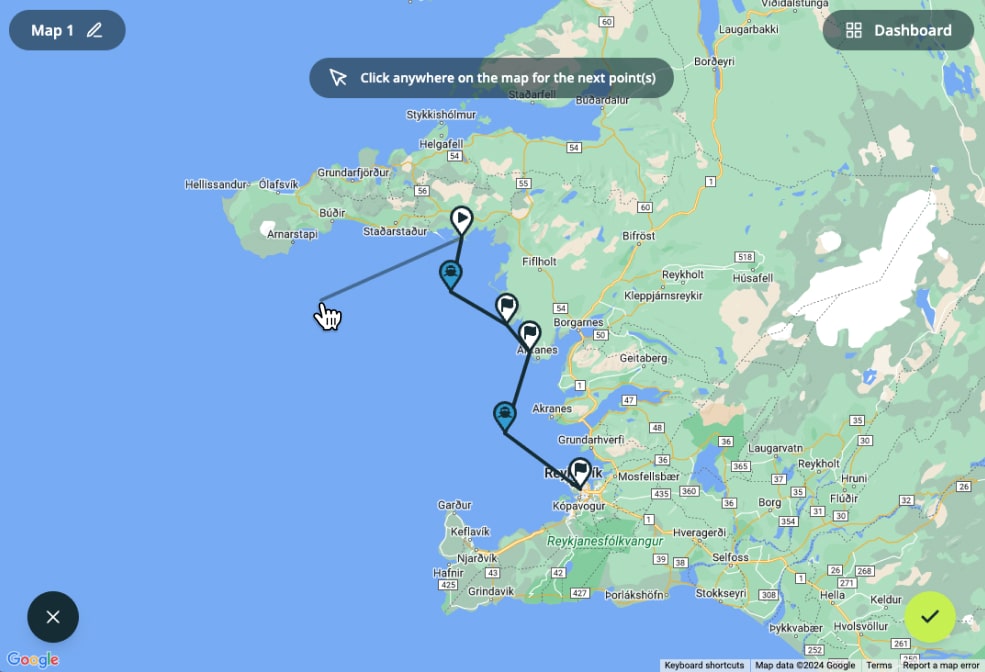
Be careful when drawing this line. It doesn't really work like "Paint" where you can just draw and the line follows your finger. You have to click on the map and a straight line will be drawn to that point from the previous point. When done you can click the "Check" icon in the bottom right corner.
From here it's the same like editing routes, just give your line a color, change its thickness and color.
Share your travel map with the world!
Alright! You've created an awesome travel map. You've added relevant content to your markers, it's all looking amazing right now! Now it's time to share your map with the world. How to do this? Map My Travels basically provides 2 ways to do this:
- Share a link to your map (on social media for example)
- Embed the map on your website
Share a link to your travel map
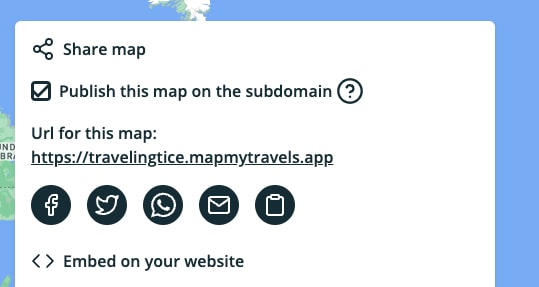
Locate the "share" icon in the bottom left corner of the map creator. Before you can share your map, you have to set up your own travel map website url. For this you have to set up a subdomain, which you can do so now. Choose a name for your travel map website that suits your brand. And choose wisely as you can only set the subdomain once!
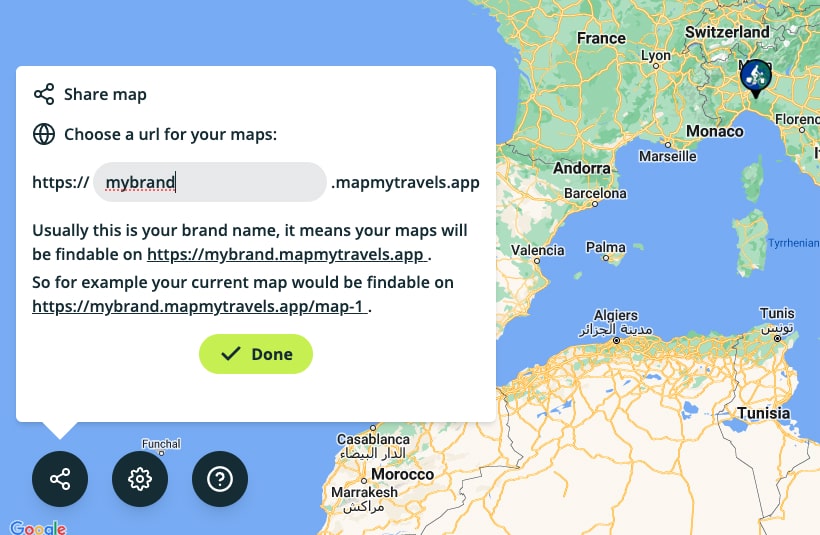
Once this is set, you will see the buttons to share your travel map with the world. You can also make sharing even easier by making the link more compact. By default your map will be found on your newly chosen subdomain + mapmytravels.app + slug. But you can also make this map findable on just your subdomain (something like: "mybrand.mapmytravels.app"). I'd recommend doing this if this is the main map you want to share around!
To learn more about how link sharing works, I created a new blog post focused on that. You can read it here.
Below this section, you see the various ways you can share your map on social media. You can quickly share it to Facebook, Twitter or X, Whatsapp and email. The last icon is a "clipboard" icon which will simply copy the link to your map to share anywhere you want.
Embed the travel map on your own website
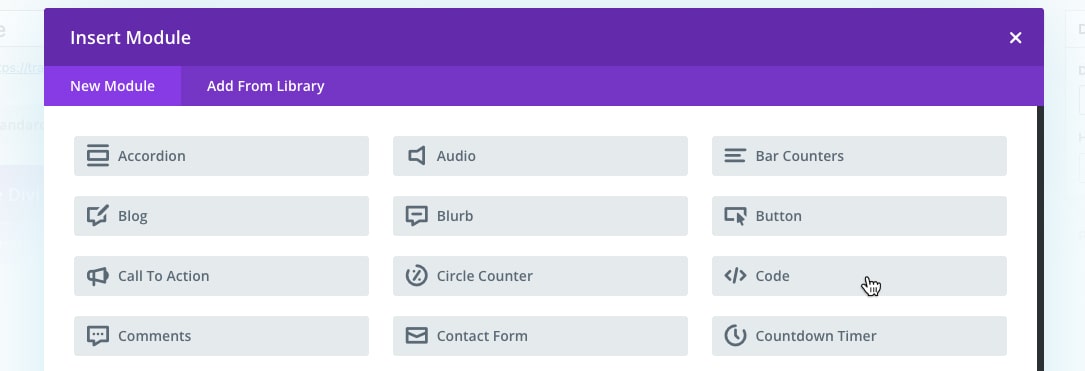
The second option is to embed your travel map on your own website. This one is also really simple and doesn't require any coding skills. All you have to do is find where you can add "custom code" to your website page. Like for example on one of my websites, I use Wordpress and the Divi Theme. This theme has different widgets you can add to a page, like titles, images etc. And then there is also a "code" widget you can add:
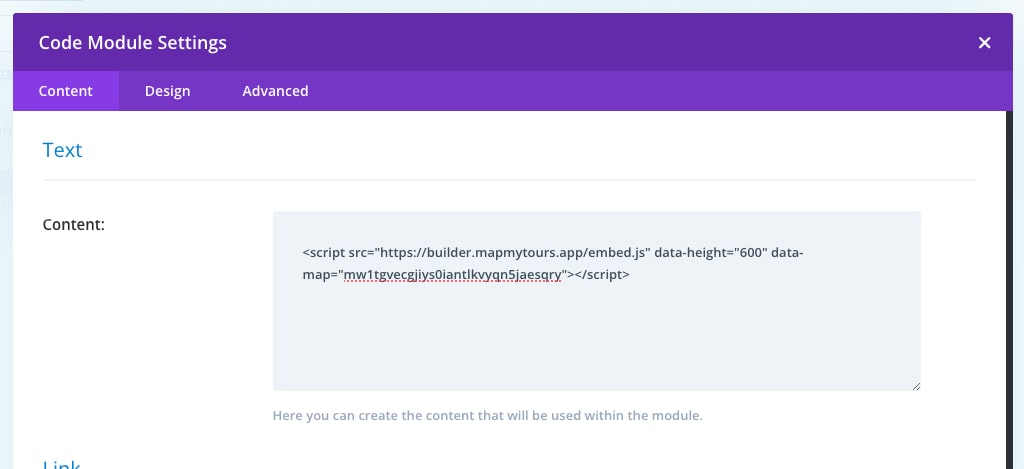
After this, hit save and see your map appear on your page! See a live demo on my personal site, or check out the awesome travel map of my friend Matt Galat on his JaYoe website.
Congratulations on creating your first travel map!
As you can read, it's really easy to create a beautiful travel map with Map My Travels! I hope you enjoy using Map My Travels and if you're not using it yet, click the button below to sign up to start mapping now! Also, if you are missing a specific feature or have any questions or suggestions, then you can always send an email to me at tice@mapmytravels.app. Happy mapping!
Related blog articles
-
How to Generate Your Custom Travel Map Website!
Discover how to easily generate a custom travel map website URL with Map My Travels. Create your own subdomain for sharing personalized travel maps online. No hosting required!
-
4 Types of Travel Map Creators to Create Custom Maps with!
Explore 4 different types of travel map creators for crafting your personalized journey maps! Whether you're a seasoned or casual traveler, this guide offers insights into custom map creators that bring your adventures to life.
-
Looking for a Travel Map Creator for Van Life, Bicycle Tours and Hiking Trails? Look no further!
Discover how Map My Travels can be the ultimate travel map creator for your van life journeys, bicycle tours and hiking trails!